Developer Guide for FinanceIt
- Developer Guide for FinanceIt
- Design
- Implementation
- Product scope
- User Stories
- Non-Functional Requirements
- Glossary
- Future implementations
- Instructions for Manual Testing
Design
Overview of Architecture
Architecture Diagram

There are 5 distinct features that exists within the FinanceIt application, all of which are accessed via the main menu interface facilitated in FinanceIt.java.
The design of the software can be split into 5 distinct components:
- Logic Manager component
- Logic component
- Input Manager component
- Data component
- Storage component
Logic Manager Component

Description
The Logic Manager component serves as the bridge between user interface and program operations.
It includes 5 classes:
ManualTrackerEntryTrackerRecurringTrackerGoalTrackerFinanceTools
API
ManualTracker,RecurringTrackerandEntryTrackermaintains an instance of aDataList(LedgerListandEntryList) inModelrespectively, and provides an interface for the user can append, remove or perform otherDataoperations with the contents of theDatalist.GoalTrackermaintains a list of income or expenseGoalsto track against entries in theEntryList, and provides an interface for the user to append or removeGoals.Finance Toolsclass provides an interface for users to utilize an array of finance calculator tools within it.- All
LogicManagerclasses use theInputManagercomponent to process user input, then useLogiccomponent to perform the operation associated with the param handling.
Design decisions
- For each feature that involves some sort of query and response, we wanted a module of classes that handles such in a systematic fashion. Five isolated classes that handles each feature in a self-contained manner helps to reduce overtly complex interactions between user and software.
Logic Component

Description
The Logic Component executes logic operations passed via a CommandPacket, by handling individual params
contained in the CommandPacket.
API
- Different
CommandHandlerclasses are used inLogicManagerclasses to handle various operations e.g. new, edit, delete - If
CommandHandlerclasses recognises aparamfrom theCommandPacketinstance, it performs a sub-operation associated with theparam. For instance,/datewill causeCreateLedgerCommandinstance to set the date of the newly created ledger. CommandHandlerin turn usesParamCheckerto verify validity of inputs before setting.
Design decisions
- The handling of parameters throughout the various features of the software have alot of common key features, including logic, input class (
CommandPacket) and error cases. Therefore we abstracted out the common behavior into an abstract class calledParamHandler, whereby the otherCommandHandlerclasses inherit from. - Along the same philosophy, we designed the
ParamCheckersingleton class to consolidate a plethora of error handling methods whereby otherCommandHandlerscan use. This is fit for the software since many of the features share strong similarities in the handling of errors and exceptions.- The alternative implementation, which is to implement logic of features independently of one another, would result in duplication of code and lack of common error-handling policy.
Input Manager Component

Description
The Input Manager consists of the UiManager class, and the Parser sub-component.
API
-
handleInput()from theUiManagerclass is called fromHandlerclasses to retrieve the raw string input from the user. Parserclasses are responsible for parsing raw String input from the user and produce aCommandPacket.CommandPacketconsists of two componentscommandStringwhich is the command entered by the userparamMapwhich is a HashMap of param entered - key is param tag and value is the raw input String.- E.g. if user inputs
new /desc Quick brown fox,commandStringwill be"add", while paramMap will consist of one key-value pair, key being"/desc"and value being"Quick brown fox"
Model Component

Description
Represents data and data list in the program, whereby program operations specified by user input can be performed upon.
API
EntryTracker,RecurringEntryTrackerandManualTrackerclasses can interact withLedgerListandEntryListinstances to perform add, remove or edit operations on theLedgersorEntryinstances in it.Storagecomponent interact withDataListclasses for save and load operations.- For save,
Storagecomponent uses theEntryTrackerandManualTrackerinstances in the program at the point of save to write to a series of text files that persists after the program closes. - For load,
Storagecomponent writes data from the text files toEntryTrackerandManualTrackerrespectively.
- For save,
- Utility Model sub-components
- Goal
- Used by the
GoalTracker. The user can set their income or expense goals by creating aGoalinstance. They can then be compared against with total entry amounts recorded by the user, whereby theGoalTrackerwill report the progress of the user towards theGoalthat they set. - More information can be found in the GoalTracker section.
- Used by the
- AccountSaver
- Stores account information of the user.
- More details can be found in the FinanceTools section.
- Goal
Storage Component

Description
Storage component performs storage of data from Goal Tracker, Manual Tracker and Recurring Tracker. It loads the data upon entry into the program and performs auto save upon exiting the program. Save Manager also added a feature that allow multiple copies of backup data to be saved and loaded.
API
manualTrackerSaver,goalTrackerSaverandautoTrackerSaverinherits some common methods fromsaveHandler. The saver classes are primarily used bysaveManagerfor file input output operations.
Logging
Description
Some classes facilitate critical operations which need to be logged for debugging purposes.
The LoggerCentre class includes all logger instances for such classes throughout the program.
API
- The
LoggerCentreinteracts withFinanceItclass directly; it creates log files in the beginning of program execution. - The
LoggerCentreconsolidates initial configuration of allloggerinstances used in the program. However, those instances will log independently of theLoggerCentre. - The
LoggerCentrecreates new log files every time the program runs from the command line. The files are in .log format and can be accessed in thelogsfolder.
Implementation
Module-level Implementation
- This section describes generalizable implementations that are similar across features.
- More components described in Feature-level implementation below.
Input Manager
- Note: Refer to Input Manager Component above for class diagram illustration of the below subsections.
Input Conventions
- The user input is composed of the following format:
<command> <param type> <parameter> <param type> <parameter> ... - The
commandstring determines the function to be executed e.g.neworedit. -
The remainder of the string includes a series of param type
-paramcombinations, wherebyparam typeindicates the type of the parameter andparamindicates the parameter that is associated with theparam type`. - Param types are restricted to two types:
/<string>, requires a corresponding parameter.- Eg.
/date 200814 param type:/dateparam:200814
- Eg.
-<string>, does not require a corresponding parameter.- Reserved for param types which are used to specify a property to be true/false
- Eg.
-auto, to specify if an entry has automatic deduction.
- A helper class. Contains two particular attributes to store the user input in an organised fashion.
commandString:StringStore the command string from the input.paramMap:HashMapStore the pairs ofparam typeandparampresent in the input string.- Key:
param type - Value:
param
- Key:
InputParser class
- A helper class. Parses the input string and returns a corresponding
commandPacket.parseInput():- Initializes a
commandPacketand populates thecommandStringattribute. - Calls ParamParser instance to parse the segment of the input string
that corresponds with the sequence of
param type-parampairs, and return a HashMap populated with the aforementioned pairs. - Returns a fully populated
commandPacketto be used by user classes.
- Initializes a
ParamsParser class
- A helper class. Parses the subsequence of the input string that corresponds with sequence of
param type-parampairs.- Parsing of input for params via
parseParams():- Step 1: Use a regex helper class
RegexMatcherto identify and extractparam typethat matches the pattern specified in “Input conventions”:/<string>or-<string>
- Step 2: Identify the substring of the rest of the input string before the next
param typeor end-of-line. This is theparamto the previously identifiedparam type. Extract it from the input string.- Eg. input is
new /desc NNN /amt 35.ParamsParserwill receive/desc NNN /amt 35as a string. - It will look for a param type - in this case the first param type is
/desc. - It then removes the param type from the string and checks for the next param or end of string.
- The next param identified is
/amt paramassociated with/descis hence everything after/descuntil/amt, which is"NNN"
- Eg. input is
- Step 3: Put the
param type-parampair into aHashMap. - Step 4: Repeat steps 1 to 4 until there is the input string is fully extracted.
- Step 5: Return a
HashMappopulated with the aforementioned pairs.
- Step 1: Use a regex helper class
- Parsing of input for params via
Logic Managers
- Note: Refer to Logic Manager Component above for class diagram illustration of the below subsections.
Execution
- Logic Managers are implemented with a common method:
execute(), which utilizes awhile loopto maintain a cycle of 2 processes: User input processing and Command handling.
User Input Processing
- Logic Managers depend on InputManager module to read user input, parse user input and produce a
meaningful
CommandPacketinstance. - The
CommandPacketinstance can then be used by the next step of the cycle.
Command Handling
- Each Logic Manager will have several methods that are dedicated to handle a single operation. They can
typically be identified by a specific naming convention:
"handle.....()". - These methods use
CommandHandlerclasses to performparamdependent operations, which involves evaluation ofparamMapin the providedCommandPacketinstance to decide the operation to perform, be it onDataorDataList.
Error Reporting
- While error handling from
paramparsing is handled byParamCheckersingleton class, there is a need to identify from the execution methods at Logic Managers, whether an exception has been thrown. - This is handled by a
try-catch blockwithin the"handle.....()"methods, whereby an exception caught will result in an error message printed. The error message will not be specific to the exact error; rather it generally indicates whether an operation has failed.
Example
- Execute Method
    public static void execute() {
        endTracker = false;
        UiManager.printWithStatusIcon(Common.PrintType.SYS_MSG, "Welcome to Manual Tracker!");
        while (!endTracker) {
            endTracker = false;
            handleMainMenu();
        }
    }
- Operation Methods
    static void handleDeleteLedger() {
        //Retrieves ledger and deletes it
    }
Logic
- Note: Refer to Logic Component above for class diagram illustration of the below subsections.
ParamChecker
- Contains a set of public static methods which verifies the validity of the raw input provided
- If there is nothing wrong with the
param, the method will typically return theparamsupplied without modification. - If the
paramfails to pass the tests administered within the method, the following procedures will execute:- Log to log file a corresponding error message with
WARNINGlevel - Print to console, any applicable error messages.
- Throw a common exception:
ParseFailParamException- The implication is that the range of exceptions that would have been caught in other
parts of the software with regards to param handling, is now consolidated within a single class in the program.
The class that uses ParamChecker is only concerned with whether the
paramis valid or not.
- The implication is that the range of exceptions that would have been caught in other
parts of the software with regards to param handling, is now consolidated within a single class in the program.
The class that uses ParamChecker is only concerned with whether the
- Log to log file a corresponding error message with
ParamHandler
CommandPacketcreated from user-input needs to be handled by a particularParamHandlersubclass, depending on what kind of command it is. E.g. CreateEntryHandler handles creating a new Entry.
CommandHandler
- Extends
ParamHandlerclass. Individual implementation ofhandleSingleParams()- E.g.
CreateEntryHandlerhandles/descparam, whereasRetrieveEntryHandlerdoes not.
- E.g.
- Used within Logic Managers to handle processing of
CommandPacket.
Handling of params by XYZCommandHandler:
- Initialize the state of the handler
XYZCommandHandler#setRequiredParams()sets required Params that need to be parsed successfully to constitute a valid input.- E.g. to create a new
RecurringEntry,/descand/dayare two of the required params, whereas editing has no required params (provided that at least one param is present).
- E.g. to create a new
- Pass
CommandPackettoParamCheckerby callingParamChecker#setPacket(packet).
- Call
ParamHandler#handleParams()- For every
paramTypein theCommandPacketinstance, executeXYZCommandHandler#handleSingleParam(packet) - If the
paramparses successfully, it will be added toparamsSuccessfullyParsed, else an Exception will be thrown
- For every
- Check if the CommandPacket is valid. The below conditions must be satisfied:
- All params set earlier via
setRequiredParams()are parsed with no exceptions thrown. That is, all params inrequiredParamsis also inparamsSuccessfullyParsed.
- All params set earlier via
- If all successful, the entry created is returned. Else, throw
InsufficientParamsException().
Feature-level Implementation
Main Menu
- Loading up user data
- Access to various features
- Saving outstanding user data to respective save files
Manual Tracker & Entry Tracker
Overview
Ledgers and Entries
In this feature, we represent the transactions incurred by the users as Entry instances.
Instances of Entry class are categorised by the date of origin, which is represented by
Ledger instances.
Entry instances are characterized by the following:
- Time of transaction
- Type of transaction: Income/ Expense
- Amount in transaction
- Category of spending/ expenditure
- Description
Ledger instances are characterized by the following:
- Time of transaction
- Collection of
Entryinstances
Manual Tracker
The Manual Tracker is a feature that allows users to manage Ledgers with create, delete and open operations. Ledgers is a class that maintains a list of transactions that are recorded for a given date.
The Entry Tracker is fundamentally similar to the Manual Tracker, except it manages Entry instances
instead of Ledger. Entry Tracker is initialized when a Ledger instance is “opened”, whereby
the Entry Tracker facilitate the manipulation of the collection of Entry instances that are associated with
that particular Ledger instance.
For the sake of brevity, this section will focus on the discussion of the Manual Tracker. The edit operation of the Entry Tracker will be discussed at the end of this section; it is sufficiently unique to Manual Tracker operations to merit detailed discussion.
The Manual Tracker is capable of executing the following states of operation:
| States | Operations |
|---|---|
MAIN_MENU |
Go to main menu for users to choose the available operations |
CREATE_LEDGER |
Create a ledger specified by date, and append it to ledgerList. |
DELETE_LEDGER |
Delete an existing ledger, referenced by date or index. |
OPEN_LEDGER |
Go to subroutine “Entry Tracker” for the entries recorded under the specified ledger. |
Architecture in Context
Logic Manager and Parser

| Class | Function |
|---|---|
InputParser |
Breaks input string by user into commandString and a sequence of paramTypes-param pairs. The latter subsequence of the string is passed into ParamParser for further processing. Information obtained from input parsing will be used to populate an instantiated CommandPacket instance, which will then be passed to the entity that called the parsing function. |
ParamParser |
Process the sequence of paramTypes-param pairs and populate the paramMap in the instantiated CommandPacket instance. |
ManualTracker |
Refer to section. |
EntryTracker |
Omitted for brevity. |

| Class | Function |
|---|---|
ManualTracker |
Refer to section. |
EntryTracker |
Omitted for brevity. |
EntryList |
Omitted for brevity. |
Entry |
Omitted for brevity. |
LedgerList |
Extends ItemList. Refer to Ledgers and Entries section for class behavior. |
Ledger |
Extends DateTimeItem. Refer to Ledgers and Entries section for class behavior. |
ItemList |
Class with defined list behavior specified with helper methods such as retrieval, checking of Duplicates and deletion. |
DateTimeItem |
Abstract class that extends Item class; instances will have LocalDate or LocalTime attributes and corresponding helper methods. |
Item |
Abstract class to define behavior of entities that need are stored in ItemList instances. |

| Class | Function |
|---|---|
RetrieveLedgerHandler |
Process paramTypes-param pairs from the CommandPacket instance to identify specified Ledger instance, then retrieves the instance from the existing LedgerList. |
CreateLedgerHandler |
Process paramTypes-param pairs from the CommandPacket instance to identify specified Ledger instance to be created, then creates the instance and append to existing LedgerList. |
retrieveEntryHandler |
Omitted for brevity. |
CreateEntryHandler |
Omitted for brevity. |
EditEntryHandler |
Omitted for brevity. |
ParamChecker |
Class contains a collection of methods that verify the correctness of the param supplied. For instance, ParamChecker.checkAndReturnIndex checks if the index provided is out of bounds relative to the specified list, and throws the relevant exception if the input index is invalid. |
ParamHandler |
Abstract class that outlines the general param handling behavior of commands instances and other classes that need to handle params in its operation. |

| Class | Function |
|---|---|
RetrieveLedgerHandler |
Refer to section. |
CreateLedgerHandler |
Refer to section. |
retrieveEntryHandler |
Omitted for brevity. |
CreateEntryHandler |
Omitted for brevity. |
EditEntryHandler |
Omitted for brevity. |
ManualTracker |
Implements Manual Tracker. Contains handler methods that implements a particular operation capable by the Manual Tracker. These methods use the above command instances for param handling operations from user input. |
EntryTracker |
Omitted for brevity. |
Functions with Sequence Diagrams
Creation of Ledger(Sequence Diagram)
- At
ManualTracker.handleMainMenu(), the user’s input is registered viajava.util.Scannerinstance. - Input is parsed by
InputParser.parseInput(), andManualTracker.packetis set to the returnedCommandPacketinstance. - The
commandStringof theCommandPacketinstance is evaluated, and the corresponding handle method() is executed.
In this case,handleCreateLedger()will be called. - At
handleCreateLedger(), the following processes will be executed:- A new instance of
CreateLedgerHandleris created. The input String array will be passed intoCreateLedgerHandler.setRequiredParams()to set required params for a successful parse. - A new instance of
Ledgerwill be instantiated and set toCreateLedgerHandler.currLedger. CreateLedgerHandler.handlePacket(packet)is called to handle params in the packet.- Refer to the section on Param Handling for more details pertaining to general param handling.
- For
CreateLedgerHandler, thehandleSingleParamabstract method will be implemented as shown in the following table.
- A new instance of
- From
ManualTracker, the configuredLedgerinstance will be retrieved from theCreateLedgerHandlerinstance and added into theLedgerListinstance atManualTracker.ledgerList.
| ParamType | ParamType String | Expected Param | Operation | Verification method |
|---|---|---|---|---|
PARAM.DATE |
“/date” | Various format of date in string, eg. “2020-03-02” | Call currLedger.setDate() to set date for the Ledger instance. |
ParamChecker.checkAndReturnDate(packet) |
![]()
Deletion of Ledger (Sequence Diagram)
The deletion of a specified ledger is performed in two phases: Ledger Retrieval and Ledger Delete.
- Phase 0: Instruction retrieval
- At
ManualTracker.handleMainMenu(), the user’s input is registered viajava.util.Scannerinstance. - Input is parsed by
InputParser.parseInput(), andManualTracker.packetis set to the returnedCommandPacketinstance. - The
commandStringof theCommandPacketinstance is evaluated, and the corresponding handle method() is executed.
In this case,handleDeleteLedger()will be called.
- At
- Phase 1: Ledger retrieval
- At
handleDeleteLedger(), the following processes will be executed:- A new instance of
RetrieveLedgerHandleris created. The input String array will be passed intoCreateLedgerHandler.setRequiredParams()to set required params for a successful parse. RetrieveledgerHandler.handlePacket(packet)is called to handle params in the packet.- Refer to the section on Param Handling for more details pertaining to general param handling.
- For
CreateLedgerHandler, thehandleSingleParamabstract method will be implemented as shown in the following table:- Note that only one of the two params need to be invoked from the input.
- A new instance of
- At
- Phase 2: Ledger Deletion
- From
ManualTracker, callledgerList.RemoveItemAtCurrIndex()to remove the ledger specified by the index set to modify earlier.
- From
| ParamType | ParamType String | Expected Param | Operation | Verification method |
|---|---|---|---|---|
PARAM.DATE |
“/date” | Various format of date in string, eg. “2020-03-02” | Call ledgerList.setIndexToModify() to set index of retrieved item. |
ParamChecker.checkAndReturnDate(packet) |
PARAM.INDEX |
“/index” | Valid index on the list from 1 onwards. | Call ledgerList.setIndexToModify() to set index of retrieved item. |
ParamChecker.checkAndReturnIndex(packet) |
![]()
Entry Tracker: Edit of entries
The editing of details within the entry is performed in two phases: Entry Retrieval and Entry Edit.
![]()
- Phase 0: Instruction retrieval
- At
EntryTracker.handleMainMenu(), the user’s input is registered viajava.util.Scannerinstance. - Input is parsed by
InputParser.parseInput(), andEntryTracker.packetis set to the returnedCommandPacketinstance. - The
commandStringof theCommandPacketinstance is evaluated, and the corresponding handle method() is executed.
In this case,handleEditEntry()will be called.
- At
- Phase 1: Entry retrieval(Sequence Diagram)
- At
handleEditEntry(), the following processes will be executed:- A singleton instance of
RetrieveEntryHandleris retrieved. The input String array will be passed intoretrieveEntryHandler.setRequiredParams()to set required params for a successful parse. retrieveEntryHandler.handlePacket(packet)is called to handle params in the packet.- Refer to the section on Param Handling for more details pertaining to general param handling.
- For
retrieveEntryHandler, thehandleSingleParamabstract method will be implemented as shown in the following table. - From
EntryTracker, callentryList.popItemAtCurrIndexto retrieve the entry specified by the index set to modify earlier.
- A singleton instance of
- At
| ParamType | ParamType String | Expected Param | Operation | Verification method |
|---|---|---|---|---|
PARAM.INDEX |
“/index” | Valid index on the list from 1 onwards. |
Call entryList.setIndexToModify() to set index of retrieved item. |
ParamChecker.checkAndReturnIndex(packet) |
![]()
- Phase 2: Entry edit (Sequence Diagram)
- Following Phase 1, the following processes will be executed:
- The singleton instance of
EditEntryHandleris retrieved. There is no need to callEditEntryHandler.setRequiredParams(); this command does not require params to modify. Instead, it acceps any params supplied and performs the edit accordingly. editeEntryHandler.setPacket(packet)is called to set packet.
- The singleton instance of
EditEntryHandler.handlePacket()is called to handle params in the packet.- Refer to the section on Param Handling for more details pertaining to general param handling.
- For
EditEntryHandler, thehandleSingleParamabstract method will be implemented as shown in the following table.
- The edited entry is added back into the list.
- Following Phase 1, the following processes will be executed:
| ParamType | ParamType String | Expected Param | Operation | Verification method |
|---|---|---|---|---|
PARAM.AMOUNT |
“/amt” | Positive Double in 2 decimal places | Call entryList.setAmount() to set amount |
ParamChecker.checkAndReturnDoubleSigned(packet) |
PARAM.TIME |
“/time” | Various format of time in string, eg. “15:00” | Call entryList.setTime() to set index of retrieved item. |
ParamChecker.checkAndReturnTime(packet) |
PARAM.INC |
“-i” | Income entry type flag | Call entryList.setEntryType(EntryType.INC) to set index of retrieved item. |
nil |
PARAM.EXP |
“-e” | Expense entry type flag | Call entryList.setEntryType(EntryType.EXP) to set index of retrieved item. |
nil |
PARAM.DESCRIPTION |
“/desc” | Description in string, ‘;’ character is illegal. | Call entryList.setDescription() to set index of retrieved item. |
ParamChecker.checkAndReturnDescription(packet) |
PARAM.CATEGORY |
“/cat” | A set of strings that corresponds with entry type | Call entryList.setCategory() to set index of retrieved item. |
ParamChecker.checkAndReturnCategories(packet) |
![]()
Recurring Tracker
Overview
Recurring Tracker handles the creation, deletion and editing of recurring entries.
Entries use the class RecurringEntry, and are stored in the RecurringEntryList class.
RecurringEntry has the following attributes:
day- The day which the transaction occursdescriptionentryType- Can beConstants.EntryType.INCorConstants.EntryType.INCdepending on whether the entry is an income or expenditure respectively.amountstartandend- Which months does the entry apply to. Set to 1 and 12 by default (i.e. occurs every month)- [Proposed] Start-end month feature: User is able to set start and end months. Reminders will not be generated for months in which entry does not occur.
isAuto- Indicates whether the entry is automatically deducted/credited from/to account, or manually deducted/credited from/to account. Causes entry to be displayed differently to the user, but does not cause different functionality.notes- Any user-specified notes
RecurringEntryList extends ItemList, and supports the following methods on top of inherited methods
addItem(Item)- Override. Adds item and sorts according to the day in ascending ordergetEntriesFromDayXtoY- Returns an ArrayList of all entries that fall between day X and Y (provided by developer in the code, not by user). Used for reminders.
![]()
Logic Manager and Handler
RecurringTracker, like EntryTracker, utilizes 3 handlers - CreateEntryHandler, EditEntryHandler and RetrieveEntryHandler.
handleCreateEntry()
- Entry creation is handled by
CreateEntryHandler, who will create an empty RecurringEntry, callParamCheckerto verify validity of input, and set the relevant fields in the RecurringEntry. - Finally, it returns the filled entry back to RecurringTracker to add to the list.
Below are the compulsory params; an Exception will be thrown by CreateEntryHandler if not all are present.
- “-e” or “-i”
- “/desc”
- “/amt”
- “/day”
Optional params are
- “-auto”
- “/notes”
The following sequence diagram illustrates the process:
![]()
handleDeleteEntry()
The only compulsory param is /id, the 1-based index of the item to delete.
- Uses
RetrieveEntryHandler, who will callParamCheckerto verify that a valid index was provided. - The handler will then remove the entry at the given index
by calling
entries#removeItemAtCurrIndex().
handleEditEntry()
Compulsory params are “/id” and at least one other param to edit
RetrieveEntryHandleris first called to retrieve the entry to be edited, similar to what occurs in `handleDeleteEntry().EditEntryHandleris then called to operate on the given entry. The overall process is similar to that ofhandleCreateEntry(), which is illustrated in the above sequence diagram, with the only difference being that there can be any number of paramTypes in the command packet depending on how many fields the user wishes to change.
Reminders
Upon launching the program, the system date and time is recorded in RunHistory.
The program then checks if there are any entries upcoming within 5 days from the current date, and prints the entries out as reminders.
- Main code calls
MenuPrinter#printReminders(), which in turn callsReminderListGenerator#generateListOfRemindersAsStrings(). ReminderListGeneratorchecks the current date, and calculates the day of month which is 5 days from current date. This is stored indayToRemindUntil.-
ReminderListGeneratorthen checks ifdayToRemindUntilis after the last day of the current month. If it is, then the reminder timeframe will overflow to the next month.For example:
- Current date is 29th October. There are 31 days in October. 5 days after today is 34th, which is beyond last day of October.
- Reminder timeframe will overflow to next month, until 3rd of November
-
If it has overflown, set
isOverflowToNextMonthto true. Subtract the last day of month fromdayToRemindUntil. The new value ofdayToRemindUntilis the day of next month that the reminder timeframe extends to.For example:
- Continuing from example earlier,
dayToRemindUntil = 34. dayToRemindUntil -= NUM_DAYS_IN_OCT, i.e. 34 - 31dayToRemindUntil = 3, representing that the reminder timeframe extends to 3rd of November
- Continuing from example earlier,
ReminderListGeneratorthen grabs the entries within the reminder timeframe from the list of all recurring entries.- If
isOverflowToNextMonth == true, it will grab all entries fromcurrentDaytolastDayOfMonthand all entries from1(1st day of next month) todayToRemindUntil - Else, it will simply grab all entries from
currentDaytodayToRemindUntil
- If
- Lastly, the list of entries will be converted to a formatted String to be displayed as reminders, and passed back
to
MenuPrinter, who will pass it toUiManagerto print.
The sequence diagram below shows how it works:

FinanceTools
Overview
FinanceTools consists of the following features
- Simple Interest Calculator
- Yearly/Monthly Compound Interest Calculator
- Cashback Calculator
- Miles Credit Calculator
- Account Storage
- Command and Calculation History
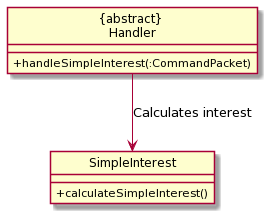
Simple Interest Calculator
Simple Interest Calculator is facilitated by SimpleInterest class. It allows user to calculate interest earned.
When user inputs simple as a command, handleSimpleInterest from Handler class will handle user
inputted parameters. The calculation is done by SimpleInterest class. The result is outputted in
FinanceTools.main().
Parameters
/a- Amount (Mandatory)/r- Interest Rate (Mandatory)
The following class diagram shows how the Simple Interest Calculator feature works:
The following sequence diagram shows how the params are handled before the implementation is carried out:
For more information on parameters handling, refer here.
.png)
The following sequence diagram shows how the Simple Interest Calculator feature works:
.png)
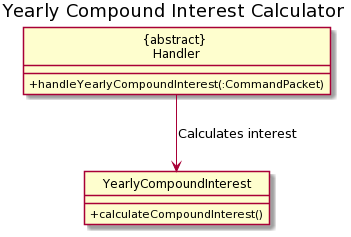
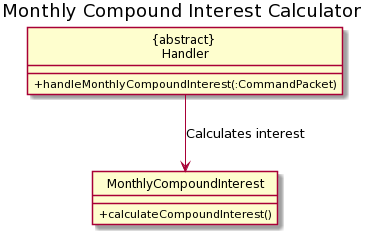
Yearly/Monthly Compound Interest Calculator
Yearly/Monthly Compound Interest Calculator is facilitated by YearlyCompoundInterest /
MonthlyCompoundInterest class. It allows user to calculate interest earned.
When user inputs cyearly / cmonthly as a command, handleYearlyCompoundInterest /
handleMonthlyCompoundInterest from Handler class will handle user inputted parameters. The calculation
is done by YearlyCompoundInterest / MonthlyCompoundInterest class. The result is outputted in
FinanceTools.main().
Parameters
/a- Amount (Mandatory)/r- Interest Rate (Mandatory)/p- Number of Years/Months (Mandatory)/d- Yearly/Monthly Deposit (Optional)
The following class diagram shows how the Yearly/Monthly Compound Interest Calculator feature works:
The following sequence diagram shows how the params are handled before the implementation is carried out:
For more information on parameters handling, refer here.
.png)
.png)
The following sequence diagram shows how the Yearly/Monthly Compound Interest Calculator feature works:
.png)
.png)
Cashback Calculator
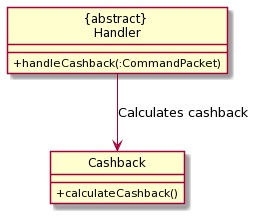
Cashback Calculator is facilitated by Cashback class. It allows user to calculate cashback earned.
When user inputs cashb as a command, handleCashback from Handler class will handle user
inputted parameters. The calculation is done by Cashback class. The result is outputted in
FinanceTools.main().
Parameters
/a- Amount (Mandatory)/r- Cashback Rate (Mandatory)/c- Cashback Cap (Mandatory)
The following class diagram shows how the Cashback Calculator feature works:
The following sequence diagram shows how the params are handled before the implementation is carried out:
For more information on parameters handling, refer here.
.png)
The following sequence diagram shows how the Cashback Calculator feature works:
.png)
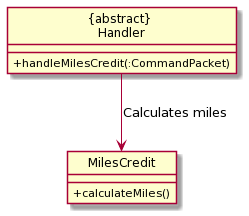
Miles Credit Calculator
Miles Credit Calculator is facilitated by MilesCredit class. It allows user to calculate miles credit earned.
When user inputs miles as a command, handleMilesCredit from Handler class will handle user
inputted parameters. The calculation is done by MilesCredit class. The result is outputted in
FinanceTools.main().
Parameters
/a- Amount (Mandatory)/r- Miles Rate (Mandatory)
The following class diagram shows how the Miles Credit Calculator feature works:
The following sequence diagram shows how the params are handled before the implementation is carried out:
For more information on parameters handling, refer here.
.png)
The following sequence diagram shows how the Miles Creidt Calculator feature works:
.png)
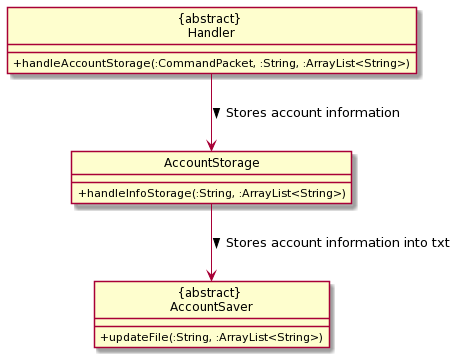
Account Storage
Account Storage feature is facilitated by AccountStorage class. It allows user to store account
information such as name of account, interest rate, cashback rate, etc. When user inputs store as command,
handleAccountStorage from Handler class will handle user inputted parameters and store information
accordingly. The implementation is done by handleInfoStorage from AccountStorage class. Afterwards, this
information is stored into a txt file which is done by updateFile from AccountSaver class.
Additionally, it implements the following operations:
info- list account(s) informationclearinfo- clear all informationstore /rm <ACCOUNT_NO>- delete corresponding account number in list
Parameters
/n- Account Name (Optional)/ir- Interest Rate (Optional)/r- Cashback Rate (Optional)/c- Cashback Cap (Optional)/o- Other Notes (Optional)/rm- Account Number (Optional)
Details
handleInfoStorage stores the user inputted information into an ArrayList which is then passed into
updateFile to update the txt file. The purpose of using txt file is so that when the user exits and enters the
program again, the information is retained, and the user does not have to re-enter the account information(s) again.
When user first enters FinanceTools in the program, readFileContents reads 5 lines in the txt file consecutively
in a while loop because these 5 lines consists of information that belong to a particular account. These
categories include: Name, Interest Rate, Cashback Rate, Cashback Cap and Notes”. Doing so helps to facilitate
the delete option where instead of deleting single lines, we can delete the entire account information
which correspond to a particular account because the information is stored in one index of the ArrayList.
The following class diagram shows how the Account Storage feature works:
The following sequence diagram shows how the params are handled before the implementation is carried out:
For more information on parameters handling, refer here.
.png)
The following sequence diagram shows how the Account Storage feature works:
.png)
.png)
Command and Calculation History
To store the commands inputted by user and results from calculations in FinanceTools, an ArrayList is used.
The commands are stored in the ArrayList before the params are handled and implementation is executed.
The results from calculation is stored in the ArrayList when the implementation has finished executed.
Goal Tracker
Set Expense Goal Feature
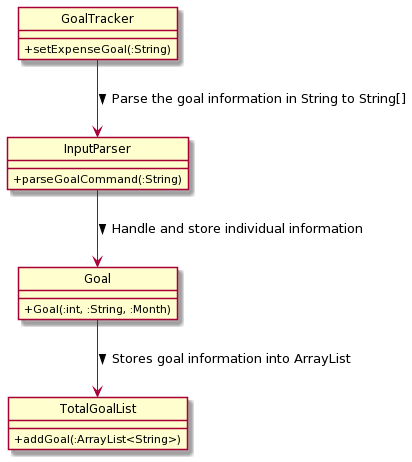
The set expense goal feature is being implemented by GoalTracker. It allows the user to set an expense goal for
the respective month to ensure that the user does not overspent his budget.
When user enter expense 2000 for 08, the command will be sent to InputParser and parse it into String[].
With the String[], it will be sent to a class called Goal, and it will store the individual information.
Afterwards, it will be added to a ArrayList in a class called TotalGoalList.
Not only that, GoalTracker also implemented a feature called set income goal that works almost the same as
set expense goal feature with just slight command difference.
Format:
- setExpenseGoal: expense 5000 for 08
- setIncomeGoal: income 5000 for 08
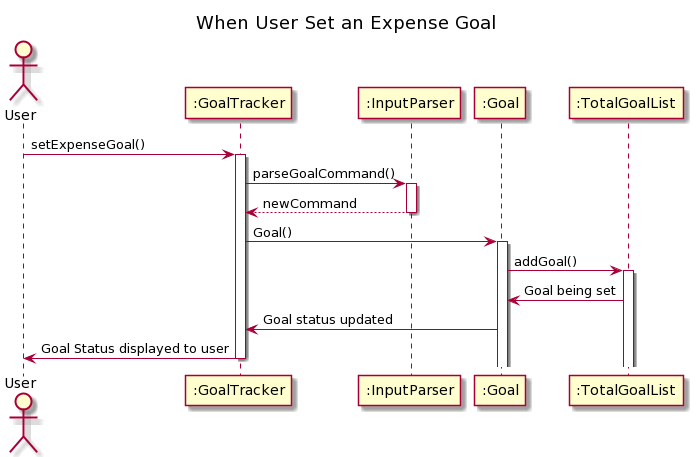
Details
Firstly, user will input the command based on the Format.
Secondly, the input command will be sent to InputParser to parse.
Thirdly, the parsed information will be sent to class Goal to store the individual information
Next, it will be added to a ArrayList in class TotalGoalList.
Lastly, the goal status will be displayed to the user.
This class diagram will show how the setting of expense goal works:
This sequence diagram will show the flow of setting of expense goal:
Storage Utility
What it does
Storage utility is a tool designed for backup and storage of all data associated with Goal tracker, Manual tracker and recurring tracker.
It performs auto loading and saving of data upon entry and exit of the program as well as allowing multiple saves to be created and loaded
at will.
Overview
Storage utility contains 5 classes. SaveHandler class contains some commonly used functions such as buildFile that is inherited to the 3
saver child classes. goalTrackerSaver produce text file to save goalTracker states, autoTrackerSaver saves recurringTracker states and
manualTrackerSaver saves manualTracker states.
Save Manager Class Diagram
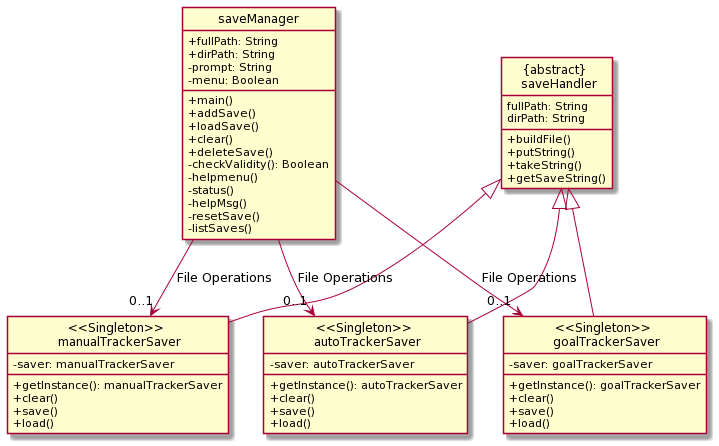
Saver classes alone can handle autosave of data during entry and when exiting the program. This is done by calling load and save functions
in the Financit main. saveManager class adds additional features that performs adding and loading of backup saves. addSave function is done
by calling save function in each respective saver class with 2 parameters attached. Since save function is implemented as variable argument
function, it is designed to accept no argument or two arguments. For the case with no argument the function will save to the default location
given during initilization of the program and used for loading during startup and saving upon exit. For the case with two argument, new directory
location is specified that is used for saving of backup data.
saveManager loadSave function was implemented by calling first the clear function in each respective saver classes, then the load functions. FileChannel is also used to copy contents of the backup save file into the default initilzation save file in case program was unexpectedly terminated.
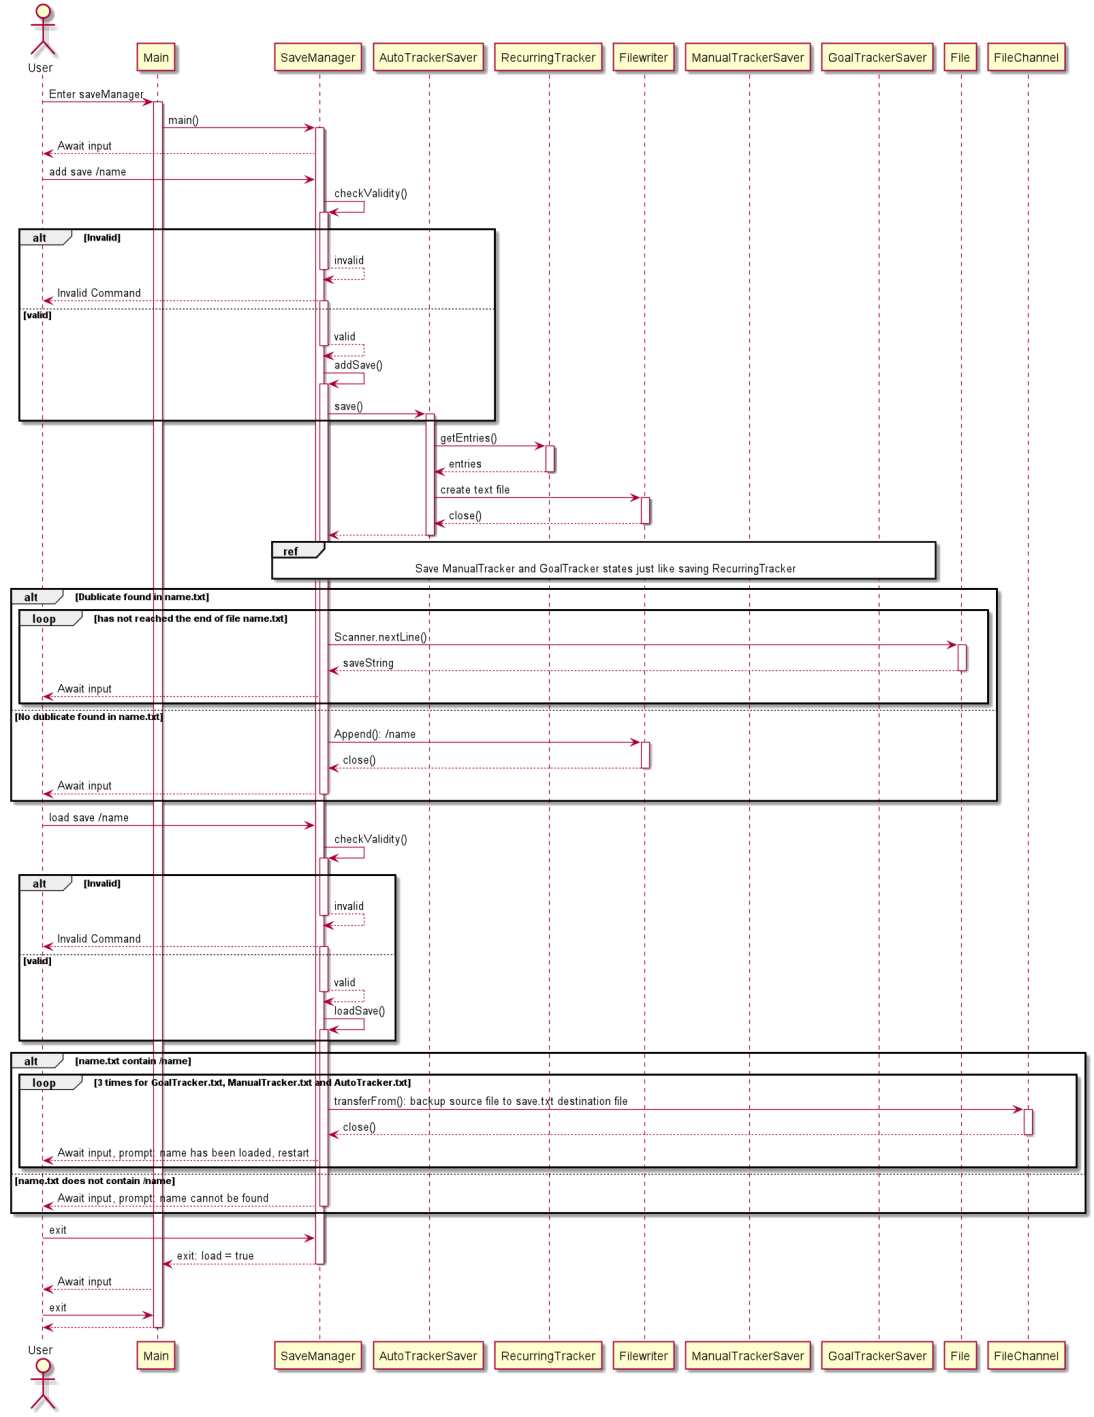
Save Manager Sequence Diagram
Product scope
Target user profile
- has a need to keep track of their expenditure and income
- needs a tool to calculate interest earned and cashback amounts
- prefers CLI over a GUI app
- can type fast
Value proposition
ManualTracker and EntryTracker
- Input itemised spending on a daily basis.
- Summarise the daily expenditure.
- Categorise expenditures (e.g. food, transport etc)
GoalTracker
- Set a budget (monthly)
- Remind users of how much budget they have left for that month
- Edit the budget (monthly)
- Display the budget for that month
RecurringTracker
- Keep track of expenditure/income that occur on a monthly basis e.g. bills and income
- Remind users of upcoming entries, e.g. a bill payment which is due tomorrow
Finance Tools
- Calculate simple interest
- Calculate compound interest with optional monthly/yearly deposit
- Calculate cashback earned
- Calculate miles credit earned
- Save account information for reference
User Stories
| Version | As a … | I want to … | So that I can … |
|---|---|---|---|
| v1.0 | financially prudent user | Keep record of my spendings of the day | I can keep track of my spending habits on a daily basis. |
| v1.0 | student who mistypes easily | Edit my transaction details using one line commands | I can correct my mis-types in a easy and intuitive way. |
| v1.0 | university student who may have difficulty keeping track of his finances | Monitor my spending habits and income according to various categories of expenditure | I can identify which particular category of spending forms the majority of my daily expenditures. |
| v1.0 | person who spends a lot of time in front of a computer | Record my expenses and income using one-line commands | I can monitor my spending habits conveniently and hassle-free. |
| v1.0 | person who owns a bank account | calculate interest over a principal amount | know how much interest I can earn |
| v1.0 | user planning for my future finances | calculate interest earned over a period time | know how much interest I can earn at the end of a period |
| v1.0 | user who owns a cashback credit card | calculate cashback earned | know how much cashback I can earn |
| v1.0 | user who owns a miles credit card | calculate miles credit earned | know how much miles credit I can earn |
| v1.0 | user who is interested about my expenses | set expense goal for 1 year | manage my expenditure according to the budget I set aside |
| v1.0 | user wants to save money | set income goal for 1 year | know how much I have saved and did I reach my saving target |
| v1.0 | user that wishes to manage my income | know my goal status everytime I made an entry | saved the hassle to go to goal tracker just to check the progress |
| v1.0 | user that has recurring bills from subscription services | add a recurring entry | Keep track of monthly transactions like income or bills |
| v1.0 | user that has recurring bills from subscription services | edit a recurring entry | update details of existing entries without having to re-enter everything |
| v1.0 | user that has multiple recurring subscription services bill | delete a recurring entry | remove recurring entries that are no longer valid e.g. cancelled subscription |
| v1.0 | user who wants to know my expenditure | create a save after I exit the program and load that save when I return | shutdown my PC and save electrical bills without losing progress |
| v2.0 | user who is planning for long-term finances | calculate interest over a principal amount with yearly or monthly deposit | know how much interest I can earn with regular deposits |
| v2.0 | user who has multiple bank accounts and credit cards | store account or card information | refer to account features such as interest rate any time |
| v2.0 | user who is new to credit cards or bank accounts | compare my calculations with different interest rate | decide which account is better |
| v2.0 | user whose expenditure is large for particular months | set expense goal for specific month | manage my expenditure monthly instead of yearly |
| v2.0 | user who wants flexibility for finance-related goals | set income goal for specific month | know exactly which month I manage to saved up to my target goal |
| v2.0 | user who has different income goals for different month | edit expense/income goal for specific month | adjust my expenditure/saving target according to the situation |
| v2.0 | user that is interested in my finances for a particular month | display expense/income goal for specific month | keep track of my progress |
| v2.0 | busy user with many bills to pay | see all my upcoming recurring entries | keep track of bill payment dates and prevent overdue fees |
| v2.0 | user that has a lot of financial-related information | be assured my saved progress is not lost if program unexpectedly terminates | work long hours without manually saving the program |
| v2.0 | user who manages finance for other people | keep multiple copies of different saves | load a different save if my friend wishes to use the program on my computer |
| v2.0 | user who is particular about sensitive information | reset my program | easily remove all saved progress without having to delete them one at a time |
Non-Functional Requirements
- Constraint - Single User Product.
- Performance - JAR file does not exceed 100Mb.
- User - Users should prefer typing on CLI
- Program - Platform independent (Windows/Mac/Linux)
- Program - Works without needing an installer
Glossary
- General
- IntelliJ - An Integrated Development Environment (IDE) used to develop FinanceIt
- CLI - Command Line Interface
- UML - Unified Modeling Language
- Technical
- Param types - A keyword to a parameter that serves as input to a particular command. eg.
/date - Param - The parameter to the command. Is associated with a param type. eg.
200404 - Param Map - A HashMap that maps Param types to their respective Params.
- CommandPacket - Class that represents the user input in distinct attributes that are easier to be accessed by the program.
- Command Handlers - Component of classes that implements a command.
- Logic Managers - Component of classes that implements the high-level logical sequence of events and operations within a certain feature.
- Logic - Component of classes that interprets CommandPacket attributes to control the low-level operation flow of a command.
- Input Manager - Component of classes that handles input by user and output to user.
- Param types - A keyword to a parameter that serves as input to a particular command. eg.
- Manual Tracker and Entry Tracker
- Entries - The class designed to represent a unit of transaction of the user.
- Ledger - A collection of entries which are incurred on the same day.
- Entry Type - Whether an entry is an Income or Expense.
- Entry Category - Type of entry along the following choices:
- Expense Entry - Transport, Food, Travel, Shopping, Bills, Others
- Income Entry - Allowance, Salary, Others
- Entry Amount - Amount of money associated with the transaction.
- Entry Description - Text for users to identify the transaction. Can include general transaction details.
- Recurring Tracker
- Entries - Transactions which occur on a monthly basis
- Day - Day of month on which the entry occurs. Can also be deadline, for instance bill due date.
Future implementations
-
Integrate Goal Tracker with Recurring Tracker
In the next version, the Goal tracker will be used to keep track not only the manual tracker but also the recurring tracker. With this feature being implemented, those fixed monthly income and expenditure will also be included into the goal tracker progress to better aid the user in managing their finances. -
Entry Categories used for analysis
In the next version, entry categories can be recorded and used in meaningful calculations to represent the user’s spending habits in a more detailed and categorised manner. Perhaps a tabulated summary of entries by each category would be helpful in assisting the users in meaningfully monitoring their spending habits.
Instructions for Manual Testing
- Download the executable from our latest release
- Save the executable file in your preferred folder
- Run the program via the command line. The command is:
java -jar financeit.jar - You should see the following output:

Testing Main Menu
- Accessing a feature (Using ManualTracker as example):
- Enter
manualinto the console. You should see the following:
- Enter

- Exiting the main menu and quit the program:
- Enter
exitinto the console. You should see the following:
- Enter

Testing ManualTracker
Show Command List
- Enter
commandsinto the console. You should see the following:

Create Ledger
Positive Test
- Enter
new /date 200505into the console. You should see the following:

Negative test: Duplicate inputs
- Again, enter
new /date 200505into the console. You should see the following:

Testing Show Ledger List
Positive Test
- Enter
listinto the console. You should see the following:

Observe that there is currently one ledger in the list, of date 2020-05-05.
- Refer to the above section on creating ledgers to create another ledger of date 2020-06-06 using the command:
new /date 200606.- Enter
listinto the console. Observe that there are now two ledgers in the list. You should see the following:

Testing Delete Ledger
Positive Test
- Enter
delete /id 1into the console.- This will delete the first ledger on index, which is of date 2020-05-05
- Enter
listinto the consolde. You should see the following:

Observe there is now one ledger on the list.
Open Ledger
- Enter
open /date 200707into the console. You should see the following:

Note that the ledger of date 2020-07-07 was not created beforehand. However, the ledger will be automatically created by the operation, and will resume as per normal.
Testing EntryTracker
- The following testing guide assumes that the test for Manual Tracker has been completed.
Show Command List
- Enter
commandsinto the console. You should see the following:

Show Category List
- Enter
catinto the console. You should see the following:

Create Entry
Positive Test
- Enter
new /time 1500 /cat tpt /amt $16.30 /desc Riding the bus back home -einto the console. You should see the following:

- Enter
new /time 1500 /cat slr /amt $16.30 /desc Riding the bus back home -iinto the console. You should see the following:

Negative Test
- Enter
new /time 1500 /cat tpt /amt $16.30 /desc Riding the bus back home -iinto the console. You should see the following:

Note that the error is thrown because category
tptis not considered an income,-i. Instead, it is considered an expenditure, and-eshould have been used instead.
Testing Show Entry List
- Enter
listinto the console. You should see the following:

Note that the number of entries is now 2.
Testing Edit Entry
- Enter
edit /id 1 /amt $0.50into the console. - Enter
listinto the console. You should see the following:

Observe that the entry of entry number 1 is not $0.50 under the Amount column.
Testing Delete Entry
- Enter
delete /id 2into the console. - Enter
listinto the console. You should see the following:

Observe the entry that is the latter to be added, entry with Entry Type = Income, is now removed from the list.
Testing RecurringTracker
- Enter
recurin the Main Menu. You should see the following:
![]()
Show Command List
- Enter
commands. Output:

Testing Add Entry
Positive Test 1: Normal Entry
- Enter
new -e /desc Netflix /amt 36.20 /day 27 /notes Cancel when finished watching Black Mirror. Output:

Entry with special day of month
- Enter
new -e /desc Drinks /amt 58.45 /day 31. Output:

Negative Test
- Enter
new /desc OIH()(&%* /amt 343243. Output:

Testing List Entries
- The following testing guide assumes that the testing above has been completed.
Enterlist. Output:

Testing Edit Entry
- The following testing guide assumes that the testing above has been completed.
Positive Test
- Enter
edit /id 1 /day 29 -i. Output:

- Enter
list. Output:
- Enter

Negative Test: No Params to Edit
- Enter
edit /id 1. Output:

Negative Test: No Such Index
- Enter
edit /id 4 /desc Hello Bubble. Output:

Testing Delete Entry
- The following testing guide assumes that all testing above has been completed.
- Enter
delete /id 1. Output:

- Enter
list. Output:

Testing Reminders
- The following testing guide assumes that all previous entries have been deleted. This can be achieved by running
delete /id 1repeatedly until list is empty. - As reminders are based on system date at time of running, the
/dayparam of the below examples will have to be modified accordingly. Simply copy-pasting the commands will not create the expected output.- Enter
add -e /desc SingTel bill /amt 120.50 /day {CURRENT_DAY}
- E.g. if today is 15th, input will be
/day 15
- Enter
- Enter
add -e -auto /desc Spotify subscription /amt 9.99 /day {CURRENT_DAY + 2}- E.g. if today is 15th, input will be
/day 17
- E.g. if today is 15th, input will be
- Enter
add -i /desc Collect cash from Sonia /amt 500 /day {CURRENT_DAY + 7}- E.g. if today is 15th, input will be
/day 22 - E.g. if today is 28th, input will be
/day 5ORday 4depending on whether the current month has 30 or 31 days respectively.
- E.g. if today is 15th, input will be
- Enter
exitto quit to main menu. Reminders are printed above the Main Menu prompt. Note: Screenshot was taken on 6th, hence entries entered above are on the 6th, 8th and 13th respective. Output:

- Enter
exitto quit the program. Run the .jar file again. Reminders are printed below the logo and above the Main Menu prompt.

Testing GoalTracker
Set Goal for Expense
Positive Test
Enter expense 4000 for 01 into the console.
You should see the following:

Negative Test
Again, enter expense 2000 for 01 into the console.
You should see the following:

Testing Set Goal for Income
Positive Test
Enter income 2000 for 02 into the console.
You should see the following:

Negative Test
Again, enter income 7000 for 02 into the console.
You should see the following:

Edit Goal for Expense
Positive Test
Enter edit expense 2000 for 01 into the console.
You should see the following:

Negative Test
Enter edit expense 4000 for 05 into the console.
You should see the following:

Edit Goal for Income
Positive Test
Enter edit income 5000 for 02 into the console.
You should see the following:

Negative Test
Enter edit income 1000 for 09 into the console.
You should see the following:

Display Expense goal
Positive Test
Enter display expense for 01 into the console.
You should see the following:

Display Income Goal
Positive Test
Enter display income for 02 into the console.
You should see the following:

Goal Status Update
When a user make a new entry, the goal status will update and display as output as shown:

Testing SaveManager
Add Save
Positive Test
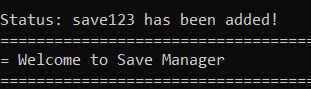
Enter add /name save123 into the console.
You should see the following:
Negative Test
Enter add /name into the console.
You should see the following:

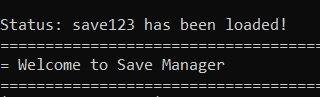
Load Save
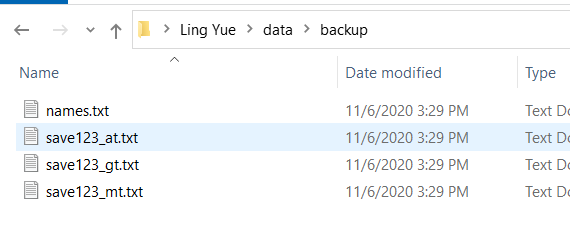
Positive Test
Enter load /name save123 into the console.
You should see the following:
Negative Test
Enter load /name wrongName into the console.
You should see the following:

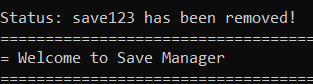
Delete Save
Positive Test
Enter delete /name save123 into the console.
You should see the following:
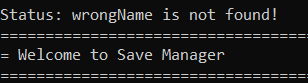
Negative Test
Enter delete /name wrongName into the console.
You should see the following:
Testing FinanceTools
Simple Interest Calculator
Enter simple /a 1000 /r 5 into the console.
You should see the following:
.PNG)
Yearly Compound Interest Calculator
Enter cyearly /a 1000 /r 3 /p 2 into the console.
You should see the following:
.PNG)
Monthly Compound Interest Calculator
Enter cmonthly /a 1000 /r 3 /p 2 into the console.
You should see the following:
.PNG)
Cashback Calculator
Enter cashb /a 1000 /r 5 /c 1000 into the console.
You should see the following:
.PNG)
Miles Credit Calculator
Enter miles /a 1000 /r 5 into the console.
You should see the following:
.PNG)
Account Storage
Enter store /n myaccount /ir 2 /r 2 /c 100 /o main account followed by info into the console.
You should see the following:
.PNG)
.PNG)